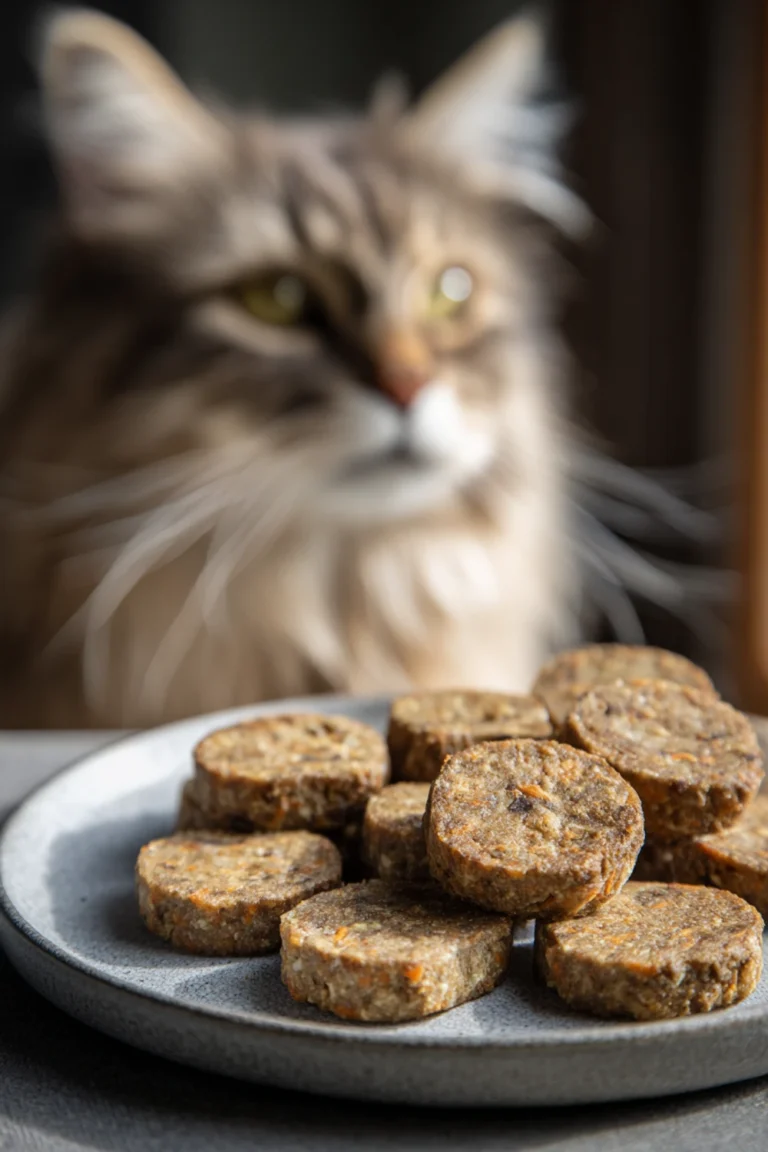
Cat biscuit recipe with rabbit grain free diet
I’ll never forget the first time I tried this cat biscuit recipe with rabbit grain free diet for my cat, Whiskers. I was so proud of myself, thinking I was a pet gourmet chef. I pulled them out of the oven, all golden brown, and presented one to him like a five-star meal. He took one delicate sniff, gave me a look of pure betrayal, and then promptly batted it under the fridge. I spent the next hour fishing out a rock-hard biscuit, realizing maybe I’d gotten the texture all wrong. But hey, we all start somewhere, right? Now it’s his favorite treat, but it took a lot of trial and error to get here.
Recipe Card
| Recipe Title | Cat biscuit recipe with rabbit grain free diet |
|---|---|
| Servings | About 20-25 small biscuits |
| Prep Time | 15 minutes |
| Cooking Time | 25-30 minutes |
| Calories | Approx. 15-20 per biscuit |
Ingredients
- 1 cup rabbit meat, cooked and finely ground
- 1/4 cup pureed pumpkin (100% pumpkin, no spices)
- 1 large egg
- 1/2 cup coconut flour
- 2 tablespoons nutritional yeast (for pets, no salt added)
- 1 tablespoon olive oil
The rabbit meat is the star, it’s a novel protein so it’s great for cats with sensitive tummies. Whiskers goes nuts for the smell. I learned the hard way that you HAVE to use coconut flour and not almond flour—almond flour made the dough way too oily and gave him a little stomach ache, poor guy. The pumpkin is my secret weapon for digestion, it helps everything move along smoothly. Nutritional yeast is like cat crack, it makes them actually want to eat the healthy stuff.
Directions
- Preheat your oven to 350°F (175°C) and line a baking sheet with parchment paper.
- In a large bowl, combine the ground rabbit, pumpkin, egg, and olive oil. Mix it really well until it’s a gross-looking but uniform paste.
- Slowly add in the coconut flour and nutritional yeast, stirring until a thick dough forms. It’ll be a bit crumbly.
- Turn the dough out onto a floured surface (use a little more coconut flour) and knead it for a minute until it holds together.
- Roll the dough out to about 1/4-inch thickness.
- Use a small cookie cutter (I use a tiny fish-shaped one) to cut out the biscuits.
- Place the shapes on the prepared baking sheet. They don’t spread much, so you can put them close.
- Bake for 25-30 minutes, or until the edges are just starting to turn golden brown.
- Turn the oven off, crack the door open, and let the biscuits cool and harden inside for an hour or so.
- Let them cool completely on a wire rack before storing in an airtight container.
The biggest mistake I made was skipping the cooling-in-the-oven step. I was impatient and pulled them out right away. They were kinda soft in the middle and got moldy super fast in the container. I had to throw out a whole batch. Letting them dry out in the warm oven is crucial for that perfect, shelf-stable crunch that cats love and that keeps them fresh.
Whiskers is so funny about these biscuits. He doesn’t just eat them. He has to carry one around the house first, meowing triumphantly, before he settles down to actually crunch on it. It’s like his little prize. The first time I got the recipe right, he did this and my heart just melted. All that work was totally worth it.
I love that this recipe is a healthy pet snack with no weird fillers. You know exactly what’s in it, which is a huge relief after all those scary recalls on commercial treats. It works because it’s high in protein from the rabbit and low in carbs, which is perfect for a cat’s diet. They’re not meal replacements, just little homemade treats to make them feel special.
If I were to change one thing next time, I might try adding a tiny bit of dried catnip into the dough. I tried it once on top, but most of it fell off. I think mixing a teaspoon right in could make them even more irresistible, especially for a picky eater like my sister’s cat.
Nutrition Info (per serving)
| Calories | Carbs | Fat | Protein |
|---|---|---|---|
| ~18 | ~1g | ~1g | ~2g |
I’m always surprised at how low the carbs are in these, which is exactly what you want for an obligate carnivore like a cat. It’s basically a little protein punch. The high protein and low carb count is fantastic for maintaining a healthy weight. For pets with sensitivities, rabbit is a lifesaver. It’s a lean, novel meat that many cats who react to chicken or beef can handle without any issues.
Ingredient Swaps
| Ingredient | Substitution |
|---|---|
| Rabbit meat | Ground chicken or turkey (if no allergies) |
| Pumpkin | Sweet potato puree (no spices) |
| Coconut flour | Tapioca flour |
I tried the chicken swap once when my butcher was out of rabbit. Whiskers still ate them, but he was noticeably less excited. The texture was also a bit different, a little more rubbery. Sweet potato instead of pumpkin worked great, it gives a slightly sweeter smell that my cat seemed to like. Tapioca flour is a good sub if you’re out of coconut, but you’ll need a bit less as it absorbs liquid differently.
Tips
- Don’t overbake them! They continue to harden as they cool. Golden brown edges are your cue to turn the oven off.
- Grind the rabbit meat as fine as you possibly can. A food processor is your best friend here. Big chunks make the dough fall apart.
- If the dough is too sticky, add coconut flour a teaspoon at a time. If it’s too dry and crumbly, add water a half-teaspoon at a time.
- Store them in the fridge if your house is warm, they’ll last longer.
I absolutely overbaked my second batch. I got distracted on a phone call and they came out looking like little brown rocks. They were so hard I was worried Whiskers would break a tooth! I had to soak one in a little water to soften it up for him to even try it. Now I set a timer and never walk away. Pet-safe cooking means being patient and watching closely.
FAQ
Q: How long do these homemade treats last?
A: In an airtight container in the fridge, they’re good for about two weeks. I’ve never had them last that long, honestly! You can also freeze them for up to three months. I usually make a double batch and freeze half.
Q: My cat is super picky. Will he even eat these?
A> I feel you! Whiskers can be a little prince. The nutritional yeast is the key. Its cheesy, umami smell is usually irresistible to cats. Crumble one up and sprinkle it on his regular food first to see if he goes for the flavor. That’s how I tested the waters.
Q: Can I use raw rabbit meat?
A: I wouldn’t. Always cook the rabbit meat thoroughly first to kill any potential bacteria. Our pets’ digestive systems can be sensitive, and it’s just not worth the risk. I boil or bake it plain with no salt or seasoning.
That’s everything I know about making cat biscuit recipe with rabbit grain free diet for my pet! Hope you give it a try, and if your furry friend turns their nose up at first, don’t get discouraged. Maybe try a different shaped cutter—apparently, my friend’s cat will only eat star-shaped treats. Go figure!
Cat biscuit recipe with rabbit grain free diet
A healthy, grain-free treat for cats made with rabbit meat, pumpkin, and coconut flour. Perfect for cats with sensitive stomachs.

Ingredients
- 1 cup rabbit meat, cooked and finely ground
- 1/4 cup pureed pumpkin (100% pumpkin, no spices)
- 1 large egg
- 1/2 cup coconut flour
- 2 tablespoons nutritional yeast (for pets, no salt added)
- 1 tablespoon olive oil
Instructions
-
Preheat your oven to 350°F (175°C) and line a baking sheet with parchment paper.
-
In a large bowl, combine the ground rabbit, pumpkin, egg, and olive oil. Mix until it forms a uniform paste.
-
Slowly add in the coconut flour and nutritional yeast, stirring until a thick dough forms.
-
Turn the dough out onto a floured surface and knead it for a minute until it holds together.
-
Roll the dough out to about 1/4-inch thickness.
-
Use a small cookie cutter to cut out the biscuits.
-
Place the shapes on the prepared baking sheet.
-
Bake for 25-30 minutes, or until the edges are just starting to turn golden brown.
-
Turn the oven off, crack the door open, and let the biscuits cool and harden inside for an hour.
-
Let them cool completely on a wire rack before storing in an airtight container.
Nutrition (Per Serving)